Internet Connection Sharing (ICS) setup (part 1)
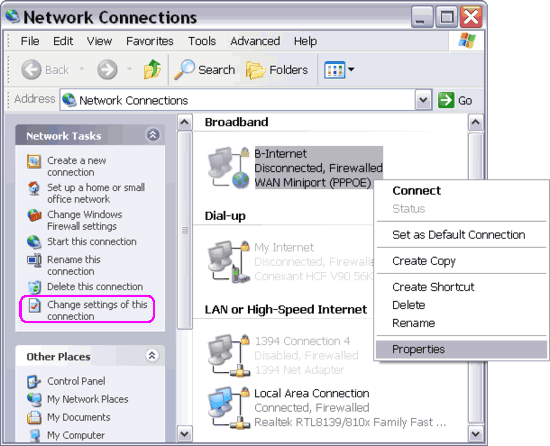
8. To configure Internet Connection Sharing (ICS), on the first
computer which is going to be the ICS host, right-click the
Internet connection that will be shared and select Properties to
open the Properties window. You can also do this by clicking
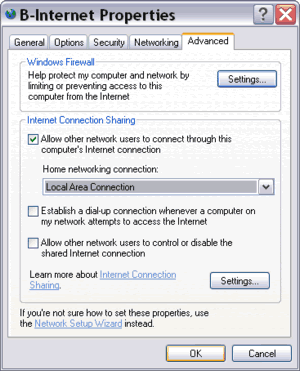
"Change settings of this connection" under Network Tasks. On the Advanced tab of
the Internet connection Properties window, check "Allow other
network users to connect through this computer's Internet
connection". Select Local Area Connection that corresponds with
the Ethernet card which is used for the direct connection from the
drop-down box. And click OK.

Figure:
Decide which Internet connection is going to be shared on the ICS host computer.
On the example above, the Internet connection is a PPPoE Broadband
(DSL/Cable) with login from Network Connections folder (in many cases
login is done via modem web interface). If your broadband Internet
connection is always on, then you must find the Local Area Connection
that corresponds with the Ethernet card which connects your host
computer to a broadband modem under LAN or High-Speed Internet.
Rename the Local Area Connection with the name of your Internet
connection for easy identification later.
Even if you have a slower Internet connection (such as PSTN/ISDN dial-up
or GPRS), you still can share the Internet connection using the above
procedure. In this case, your Internet connection must appear under
Dial-up.

Figure:
To enable ICS for the Local Area Connection.
If ICS options aren't available on the Advanced tab of
your Internet connection Properties window, your direct Ethernet
connection must haven't been working. You'll have to reconfigure it.
Please note, if you have more than one network adapters installed in
your computer, you'll see a drop-down list providing several home
networking connections (LANs). You must select one, i.e. the Local Area
Connection that corresponds with the Ethernet card used for the direct
connection.
|